VagrantをMac OS Xにインストールし、Boxをベースにして仮想マシンを立ち上げる
今年の6月頃にドットインストールを見つつインストールや設定した際のメモ
Evernoteだと記事がどこにあるのかが分からなくなるのでBlogにあげておく
Vagrantとは
- 仮想マシンを簡単に立ち上げるためのツール
- 公式サイト:http://www.vagrantup.com/
- メモ
- 仮想マシン用ツールとして下記3つがあるが
- VirtualBox、VMWare、EC2
- 仮想マシンを作るツールとして「VirtualBox」(フリー)を使用する
導入環境
Mac OS X 10.8.5
Virtualboxをインストール
https://www.virtualbox.org/wiki/Downloads

Vagrantをインストール
http://www.vagrantup.com/downloads

Vagrantをインストール後
$ vagrant --version
Vagrant 1.6.3
公式サイトからBox(テンプレート)を取得する
OK
$ vagrant box add hashicorp/precise64
==> box: Loading metadata for box 'hashicorp/precise64'
    box: URL: https://vagrantcloud.com/hashicorp/precise64
This box can work with multiple providers! The providers that it
can work with are listed below. Please review the list and choose
the provider you will be working with.

1) hyperv
2) virtualbox
3) vmware_fusion

Enter your choice: 2
==> box: Adding box 'hashicorp/precise64' (v1.1.0) for provider: virtualbox
    box: Downloading: https://vagrantcloud.com/hashicorp/precise64/version/2/provider/virtualbox.box
==> box: Box download is resuming from prior download progress
==> box: Successfully added box 'hashicorp/precise64' (v1.1.0) for 'virtualbox'!
NG
- http://docs.vagrantup.com/v2/boxes.html
- 紹介された通りにコマンド叩いて失敗したのは情報が古かったから?
$ vagrant box add USER/BOX
The box 'USER/BOX' could not be found or
could not be accessed in the remote catalog. If this is a private
box on Vagrant Cloud, please verify you're logged in via
`vagrant login`. Also, please double-check the name. The expanded
URL and error message are shown below:

URL: ["https://vagrantcloud.com/USER/BOX"]
Error: The requested URL returned error: 404 Not Found
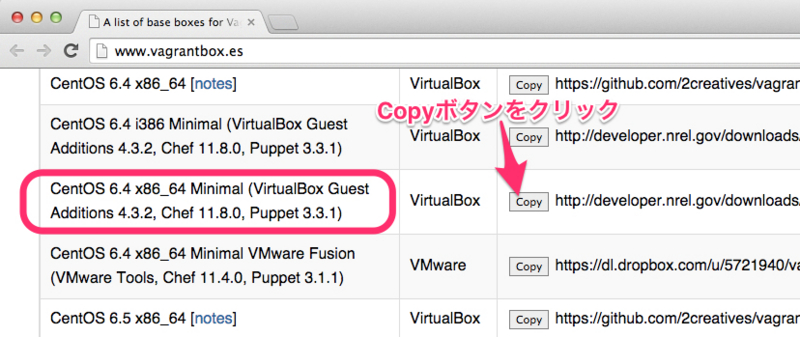
「Vagrantbox.es」サイトからBox(テンプレート)を取得する
- 有志で作成されたBox提供サイト
- 今回は下記のBoxを使用した
CentOS 6.4 x86_64 Minimal (VirtualBox Guest Additions 4.3.2, Chef 11.8.0, Puppet 3.3.1)

上記でコピーしたBoxのURLを「vagrant box add centos64」の後に貼り付けて実行する
$ vagrant box add centos64 http://developer.nrel.gov/downloads/vagrant-boxes/CentOS-6.4-x86_64-v20131103.box
==> box: Adding box 'centos64' (v0) for provider:
    box: Downloading: http://developer.nrel.gov/downloads/vagrant-boxes/CentOS-6.4-x86_64-v20131103.box
==> box: Successfully added box 'centos64' (v0) for 'virtualbox'!
$ vagrant box list
centos64            (virtualbox, 0)
hashicorp/precise64 (virtualbox, 1.1.0)
$ cd ./.vagrant.d/boxes
$ ll
total 0
drwxr-xr-x  3 user  staff  102  6 17 14:45 centos64
drwxr-xr-x  4 user  staff  136  6 17 14:32 hashicorp-VAGRANTSLASH-precise64
Boxから仮想マシンを立ち上げる
1つのBoxから複数のマシンを立ち上げることができる
必ずしも1Box=1マシンではない
$ mkdir myCentOSVM
$ cd myCentOSVM/
$ vagrant init centos64
A `Vagrantfile` has been placed in this directory. You are now
ready to `vagrant up` your first virtual environment! Please read
the comments in the Vagrantfile as well as documentation on
`vagrantup.com` for more information on using Vagrant.
$ ls
Vagrantfile
$ less Vagrantfile
(省略)
Vagrantfileの中身はRubyで書かれており、コメントが充実しているらしい
$ vagrant up
Bringing machine 'default' up with 'virtualbox' provider...
==> default: Importing base box 'centos64'...
==> default: Matching MAC address for NAT networking...
==> default: Setting the name of the VM: myCentOSVM_default_1402984762653_96892
==> default: Clearing any previously set network interfaces...
==> default: Preparing network interfaces based on configuration...
    default: Adapter 1: nat
==> default: Forwarding ports...
    default: 22 => 2222 (adapter 1)
==> default: Booting VM...
==> default: Waiting for machine to boot. This may take a few minutes...
    default: SSH address: 127.0.0.1:2222
    default: SSH username: vagrant<p><span itemscope itemtype="http://schema.org/Photograph"><img src="http://cdn-ak.f.st-hatena.com/images/fotolife/p/pyoonn/20140919/20140919162049.jpg" alt="f:id:pyoonn:20140919162049j:plain" title="f:id:pyoonn:20140919162049j:plain" class="hatena-fotolife" itemprop="image"></span></p>

    default: SSH auth method: private key
    default: Warning: Connection timeout. Retrying...
    default: Warning: Remote connection disconnect. Retrying...
==> default: Machine booted and ready!
==> default: Checking for guest additions in VM...
==> default: Mounting shared folders...
    default: /vagrant => /Users/user/myCentOSVM
上記でmkdirしたmyCentOSVMディレクトリと同名で、仮想マシンが起動する

仮想マシンを起動・終了
- status:状態を見る
- suspend:スリープさせてすぐに立ち上げたい場合
- resume(リジューム):スリープから復帰させたい場合
- halt(ホルト):終了
- up:立ち上げる
- reload:再起動
- destory:仮想マシンを削除
$ vagrant status
Current machine states:

default                   running (virtualbox)

The VM is running. To stop this VM, you can run `vagrant halt` to
shut it down forcefully, or you can run `vagrant suspend` to simply
suspend the virtual machine. In either case, to restart it again,
simply run `vagrant up`.
$ vagrant destroy
    default: Are you sure you want to destroy the 'default' VM? [y/N] y
==> default: Forcing shutdown of VM...
==> default: Destroying VM and associated drives...
vagrant destroyすると仮想マシンが削除されるが、それはViartualBox上で確認できる
下記画面では「myCentOSVM」が削除されているのが分かる

仮想マシンに接続する
destroyしたので、再度、vagrant upする
$ vagrant up
$ vagrant ssh
Welcome to your Vagrant-built virtual machine.
[vagrant@localhost ~]$ pwd
/home/vagrant
仮想マシン上でWebサーバを立ち上げる
Webサーバをインストールする
[vagrant@localhost ~]$ sudo yum -y install httpd
Webサーバを立ち上げる
[vagrant@localhost ~]$ sudo service httpd start
再起動してもWebサーバがONになっているように設定する
[vagrant@localhost ~]$ sudo chkconfig httpd on
ファイヤーウォールがあると設定が面倒なため、ファイヤーウォールを切る(ローカル環境なのでOK)
[vagrant@localhost ~]$ sudo service iptables stop
再起動した時に立ち上がらないようにOFFにする
[vagrant@localhost ~]$ sudo chkconfig iptables off
Webページ作成し、それをブラウザから見る
htmlディレクトリでindex.htmlファイルを作成する
[vagrant@localhost ~]$ cd /var/www/html
[vagrant@localhost html]$ ls
[vagrant@localhost html]$ sudo vi index.html
[vagrant@localhost html]$ cat index.html
<h1>Hello world!</h1>
vagrantを出る
[vagrant@localhost html]$ exit
logout
Connection to 127.0.0.1 closed.
$ ls
Vagrantfile
Macから仮想OSの中身を見るには3つの方法があるが、プライベートネットワークを使うのが簡単
$ vi Vagrantfile

Vagrantfile内の下記行から#を外して、有効にする
# config.vm.network "private_network", ip: "192.168.33.10"
設定を変更したため、仮想マシンを再起動する
$ vagrant reload
192.168.33.10にアクセスできない!
VagrantでCentOS、Webサーバを立ち上げて、「192.168.33.10」に接続しようとしたところ、接続できない
下記ディレクトリに用意したindex.htmlファイルが表示されず
- /var/www/html/index.html
解決方法

解決!
